This small category mount can carry up to 25 kg and it is addressed to astronomers
who make no compromise when it comes to quality and do not want to do astronomy
with large instruments.
The mount
comes in a lining that can accommodate to a carrying case and no need to buy the
special box for transport that cost from € 155.
The saddle of mount supports both Vixen
and Losmandy standards which is a great advantage especially for those who have
several models of telescopes.
At first glance is impressive,
materials are very high quality and the design draws you in from the first
moment.
The controller is large and
beautifully lit, you can’t
miss it in dark, the buttons seem a little too big but respond well to commands
and the menu is not complicated, you can learn it quickly.
First night, 23-24 may 2014
In the first night, I was familiar
with the mount, I opened the box, I installed it, I balanced it, but I was
wrong the time settings and the mount was set to 2 hours before local time,
which gave me some large errors on calibration.
300” exposure unguided
I also had problems with clouds. They
came, they went, they cover the calibration stars and finally come and have
never left at all.
Second night, 24-25 may 2014
Announced clean since the day when it
rained a little, then the clouds began to dissipate.
After several unsuccessful attempts I
found the error on local time and after I fix it things began to unfold in the
most beautiful way possible .
I
started with rough polar alignment of the mount when I directed her towards the
North Star using my RDF mounted on William Optics refractor .
I
continued with 3 stars align procedure where, to my surprise, alignment stars
appear in the visual field of the camera wich has 2.87⁰ x 1,91 ⁰ on my setup
.
I
refined the alignment with 10 stars and for my surprise the handpad show me the
RMS error in minutes and seconds of arc after each refined star centred on
reticle with handpad buttons. Well, this RMS error decrese after each refining
star added. I have added only 10 stars for refining my alignment because the
short time I had at my disposal, but the maximum number is 25.
Then
I applied the polar alignment routine from controller and I realigned with
3-star. The second 3-star alignment was flawless because I didn’t do any
adjustments with buttons, the mount put the stars right in the center of
reticle. I added another 10 stars to refine the alignment . Finally , I checked
the polar alignment error and was somewhere near 10 ' . In those conditions ,
especially given the limited time I had available, I think I did it very well .
I didn’t had time to test
Per
Frajval’s Model Maker to make the alignment model.
These are the tests:
-
Refractor William Optics 90mm F/6.2
-
Corrector/ReducerTeleVue TRF-2008
-
Ultimate 600D
-
In PixInsight I croped an 1:1 from
center of image.
Test 1 – 300” exposure unguided – M106
Test 2 – 600” exposure unguided – M106
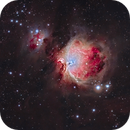
Test 3 – 900” exposure unguided – NGC 6960

Conclusions:
The stars from central part are almost
perfectly round. Downright impressive exposure especially for the 900” one.
What I like:
-
Opening and understanding that I received from
the company Baader Planetarium and whom I thank this way.
-
Quality of materials.
-
Very easy assembly and ease of use.
-
Balancing routine that helps the mount for a
perfect swing.
-
The aligning procedure although it takes a
fairly long time is very accurate and the controller lets you know how's RMS
error which is very useful for accuracy in astrophotography.
-
Polar alignment is very easy and not necessarily
need the North Star.
-
Atmospheric refraction compensation function.
-
Function that correct the tube flexure and cone
error.
-
900 seconds exposure unguided think that says it
all about what is able to do this mount.
-
Maximum slew rate is 15 ⁰ however mount is very
quiet; at normal slew speed of 7 ⁰ you hear almost no sound.
-
The mount controller can connect to a computer
via an Ethernet connection, making it ideal for automated systems.
-
I had the opportunity to do an speed test
because a colleague own an ASA DDM 60 mount and 10 Micron 1000 HPS did very
well, reached the chosen star almost simultaneously at maximum speed.
What I don’t like:
-
The cable between the mount and the controller
is too short, I haven’t measured but has no more than 30 cm. I understand that
the system is designed to hanging below the mount but at some tripods this is
not possible, and some users who have mobile astro systems would want to
protect it better.
-
Mount that I tested did not have the power cord,
do not know if it comes from the manufacturer or was an oversight. The fact
that has no power source like standard I only mention it here, no longer
comment, but it seems to me a wrong marketing approach although I understand
that the same policy exists and competition.
-
I wanted to find on CD an astrometric alignment
software but it was only an firmware.
-
The purchase price is prohibited for the
socio-economic conditions in Romania.


